“Pointless” Crochet Rug Pattern

image
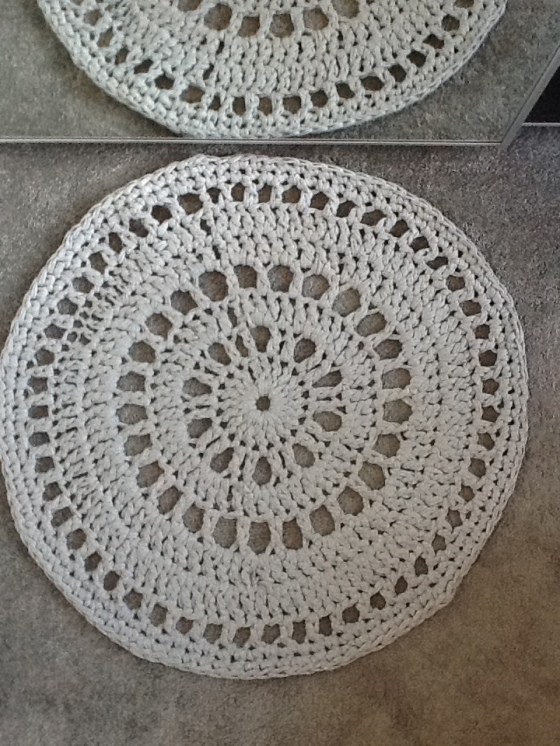
I’ve called this the Pointless Crochet Rug as I made it when I had no need for a rug and actually nowhere for it to go! So it was rather pointless! Still it’s still fab, so I thought I’d share my pattern. (*disclaimer – I did look at hundred’s of crochet rugs before I made this, so while it might resemble a few others, I didn’t find one I liked so I made this up as I went along. After frogging the and second) attempt!)

I used Boodles textile yarn available at Hobbycraft
15mm hook

  • Chain 4 and join with a ss to make a ring.
  • Ch3, 19 trebles into the ring, join to top of ch3 (20sts)
  • Ch3, tr in next st, ch2, * tr in next 2 sts ch2* rep from * 8 more times. Join to initial ch3.
  • Ch3, tr in next st, 3tr in ch2 space, * tr in next 2 sts, 3tr in ch space rep from * 8 times. Join to top of ch3.
  • Ch5, sk tr, tr in next stitch, *ch2 sk tr, tr in next st*, rep from * 21 times Join to 3rd ch of initial ch5
  • Ch3, 2tr in ch2 space, tr in top of next tr, *2tr in ch2 space, tr in next stitch* rep from * Join with ss in 3rd chain of initial ch
  • Ch3, tr in each of next 2 stitches, 2tr in next stitch. *tr, tr, 2tr* rep from *
  • Ch3, tr in each stitch around
  • Ch4, sk tr, tr in next stitch, *ch1 sk st, tr in next st* rep from * Join to 3rd ch of intial ch4
  • Ch1, dc in same stitch, double crochet in each stitch around.
  • Ch1, dc in same stitch, dc in next 9 stitchs, 2dc in next stitch, double crochet in each of next 9 stitches, 2dc in next st. 9dc, 2dc in every 10th stitch. Join to 1st dc and fasten off.

How to crochet a chainless foundation row

The worst bit of blanket making, except sewing in the ends, is the initial chain. When I made my granny stripe I had an initial chain of 240 which I then had to go back along and do double crochet in every stitch!! Learning how to do the foundationless chain or chainless foundation, halves the job, as you do the chain and the first row all in one go, whoop!! You can work this chain for any stitch, for this tutorial I will be doing treble (uk terms). To start off chain 4 then yarn over go into the first chain and continue from point 2 below.

2013-11-14 14.07.41

yarn over, you are going to insert your hook in the bottom loop you can see at the base of the last stitch

2013-11-14 14.08.01

3 loops on hook. yarn over again and pull through the first loop,

2013-11-14 14.08.25

3 loops on hook, yarn over and pull through 1st loop only

2013-11-14 14.08.50

this creates the ‘chain’ bit, yarn over again and you now complete the treble as normal taking the yarn through 2 loops

2013-11-14 14.09.05

2 loops on hook, yarn over and pull through remaining 2 loops to complete the treble

2013-11-14 14.09.22

completed

2013-11-14 14.09.38

here you can see a few in a row, note the ‘chain’ stitch you can see along the bottom, this is what you work into first.

2013-11-14 14.15.02

your completed chain should look like this, single ‘loops’ at the bottom and the usual ‘v’ along the top

 I really hope this is clear and easy enough to follow, if you have any problems please leave a comment and I’ll do my best to help.

Tee Pee

IMG_20130428_161552

Earlier this year I finally made a teepee for the kids. I had been threatening to do it for months(years) and so I ordered (cheap) fabric and set to it. I had looked at a few patterns/tutorials online but they weren’t quite what I had in mind so I winged it! What follows is what I did but it is by no means a tutorial!

IMG_20130423_115319

I bought 6 metres of fabric, folded it into 4  along its length and cut out a triangle shape. Technical eh! Cutting from the bottom 2 corners up the the middle of the top edge. Basically the width of my fabric decided how wide my side panels would be. I told you it was technical! With it being the first one I had made I didnt want to be piecing fabric together to make the sides so i ddi it like this for simplicity.

IMG_20130423_203517

pinned together

From the off cuts I made 4 channels, one for each corner for the pole to go through. 4 long ties to tie around the poles at the top and 4 little pockets for the bottom of the pole to sit in. this prevents the poles moving too much.

For the front opening panel I took one of my triangles and cut off the top, with some other off cuts I made 2 doors, hemmed the edge where they meet, sewed them to the top piece and then attached to either side, as I had done with the other sides, remembering to put the pole channel in between.

As you can see it does its job, it is by no means perfect and had I had more fabric I would have attempted a base/floor for it.

Apologies for the lack of photos of the actual making but I hadn’t thought about blogging it until it was finished!

Finished and up!!

IMG_20130428_161552IMG_20130428_161226IMG_20130428_161234IMG_20130506_143134